This is a guest post
These crunchie brownies are deliciously gooey, chocolaty and utterly epic. They are filled with crunchie spread and crunchie pieces.

If you haven’t come across a crunchie bar before where have you been?! They are made by Cadbury’s are they are basically honeycomb wrapped in milk chocolate. They also have a crunchie spread which is chocolate spread with little honeycomb pieces in.
I have wanted to make a recipe based around Crunchies for such a long time, so I was so excited when I saw Lauren’s Tweet asking for guest bloggers and even more excited when she asked for this recipe.
Before you start baking
Okay, so before you start baking you need to preheat your oven. This is such an important step because it ensures that your brownies are going to bake at the right temperature and you aren’t going to end up with them under baked or over baked.
I preheat my oven just before I start and by the time my brownie mixture is ready the oven is the correct temperature.
Next line a brownie tin with baking parchment and leave to one side. Finally you want to cut your crunchie bars up and leave these to one side. It is completely up to you how big/small you want to cut them. You don’t want to crush them into crumbs you want them to be a little chunky so when you are eating a brownie you get delicious little honeycomb chunks.

Crunchie brownies
To make the brownies first off pop your butter and chocolate in a heatproof bowl and melt in the microwave on 20-second bursts until they are completely melted and smooth. Leave to one side.
In a separate bowl you want to add the butter and sugar and mix on a medium speed. I used the whisk attachment on my Kitchen Aid but you could use a hand whisk or even a wooden spoon. You want to whisk until the mixture is double in size and pale in colour.
Add the chocolate mixture into your egg mix and fold through. I find it easiest to fold with a spatula but you could use a wooden spoon too. I wouldn’t recommend mixing these using a stand mixer or hand mixer because you don’t want to beat all the air out of the egg mixture.
To fold go around the side of the bowl with your spatula or wooden spoon and fold the mixture in on itself and then cut through the middle of the mixture again folding it in on itself. Repeat until the chocolate is completely incorporated.
Add the flour and cocoa powder and fold again until fully incorporated.
Finally add in the crunchies and chocolate chips and fold these through until they are evenly distributed.
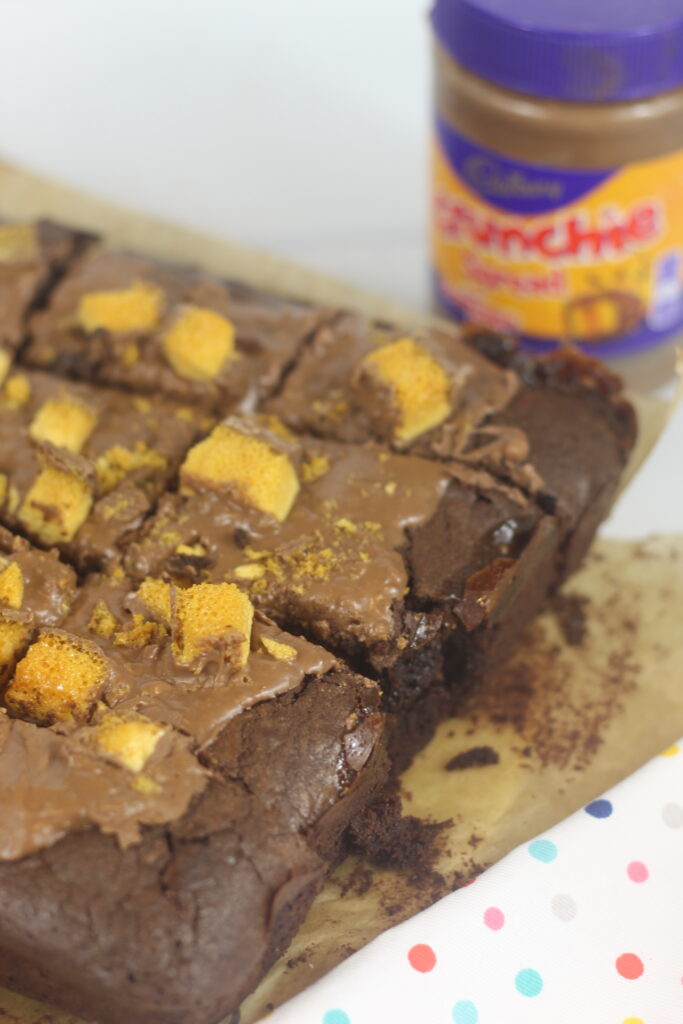
Crunchie spread
Pour the mixture into your brownie tin and smooth.
Don’t worry I haven’t forgotten the crunchie spread. Add half the crunchie spread to a heatproof bowl and melt in the microwave for 20 seconds.
Add spoonful’s of the spread over the top of the brownies. They don’t need to be even in size or quantity. Now using a skewer mix the swirl the spread into the brownies. I hope this makes sense it is really difficult to explain. You want the spread to be in blobs over the top of the brownies and then you don’t want to completely mix it in just swirl it gently. So when you are eating the brownies you get a lovely bit of delicious spread.
Bake in the oven for 30-35 minutes.

How do I know when the brownies are ready?
Telling when brownies are ready can be difficult. I wouldn’t recommend using a cake skewer to test them because you want them to be gooey on the inside. If you use a cake skewer there will be batter on the end.
I normally go by how they look. The brownies should look dry on the top and have a very slight wobble to them.
If you take them out and they are cake like you baked them for too long but they should still be delicious.
Leave them too cool fully in the tin.
Decorating the brownies
To decorate the brownies add the remaining crunchie spread to a heatproof bowl and soften slightly in the microwave. Mine was in for around 10 seconds but this depends on your microwave. You want it to be soft enough to spread over the top of the brownies.
Once your spread is lovely and soft. Pour it over the top of the spread it over the top of the brownies. I didn’t spread it right to the edges I left about 1cm around the edges of the brownies.
Finally chop or crush up your crunchies and sprinkle over the top.
Alternatives
You can make these using any chocolate you fancy. Depending on what your favourite is you can definitely swap the crunchie for them.
You don’t need to add the spread and crunchie to the top this is completely optional.
I wouldn’t recommend using milk chocolate instead of dark. Trust me, I’m not the biggest fan of dark chocolate but these brownies don’t taste too bitter.

Equipment
Brownie Tin
Mixing Bowls
Scales
Spatula
Shopping list
- 225g unsalted butter or Stork
- 225g dark chocolate
- 4 large eggs
- 300g light brown sugar
- 175g plain flour
- 50g cocoa powder
- 200g chocolate chips
- 120g Crunchies (4 Crunchie bars)
- 200g Crunchie spread
For the decoration
- 200g Crunchie spread
- 120g Crunchies (4 Crunchie bars)

Method
To Make the Brownies
- Preheat the oven to 180C (160C Fan) and line a brownie tin with baking paper.
- Cut up your crunchies (these don’t need to be even and can be whatever size you fancy) and leave to one side.
- Melt together the chocolate and butter in 20 second bursts, stirring in between, until they are both completely melted. Leave to one side.
- In a large bowl whisk together the eggs and sugar until doubled in size and pale in colour.
- Pour the chocolate mixture, into the egg mixture and fold together. You need to be gentle during the stage because you don’t want to knock all the air out of your eggs.
- Add in the flour, cocoa powder and fold again until they are all completely incorporated
- Finally add in the chocolate chips and your chopped crunchies and fold through until they are evenly distributed.
- Pour the mixture into your brownie tin.
- Add the crunchie spread to a heatproof bowl and soften in the microwave for 10-20 seconds.
- Spoon the mixture onto the top of the brownies and swirl it into the mixture using a skewer.
- Bake in the oven for 30-35 minutes. You will know they are ready because they will have a slight wobble.
- Leave to cool completely in the tin.
To decorate
- Once the brownies have cooled completely cut or crush the brownies and leave to one side.
- In a heat proof bowl soften the crunchie spread for 10-20 seconds in the microwave.
- Spread the mixture over the top of the brownies leaving a little border around the edges. I left about 1cm.
- Finally sprinkle over your crushed/chopped crunchie to decorate.

A little bit about me
My name is Sarah and I am the face behind A Spoonful of Vanilla. I started my blog in January 2020 as a place to share all of my creations. I have loved baking since I was young but started creating and experimenting with my own recipes when I studied at University. I have always found baking the perfect way to de-stress and just forget about everything going on in the outside world for a few hours.
Social links
Blog – www.aspoonfulofvanilla.co.uk
Twitter – twitter.com/aspoonofvanilla
Instagram – instagram.com/aspoonofvanilla
Pinterest – pinterest.com/aspoonfulofvanilla
Facebook – facebook.com/aspoonfulofvanilla
Pateron – https://www.patreon.com/aspoonofvanilla
YouTube – https://www.youtube.com/channel/UC9SvFsxtdJLwwjU2RF7e02Q
TikTok – @aspoonofvanilla
This looks delicious, I would want to try this out. The last time I tried making brownies, it turned out hard to eat. Maybe I would just follow your instructions to fold instead of using hand mixer,
Thank you so much for this
I hope these turn out better for you!
My mouth is watering just reading this! Will definitely be bookmarking this 🙂 xx
Mine was too when Sarah sent the recipe over, they sound (and look) delicious!
This Crunchie brownie recipe looks so good! These brownies look delicious! x
Lucy | http://www.lucymary.co.uk
They look so yummy don’t they?!
OMG! Crunchie was one of my favourite chocolate bars growing up! I have to try this recipe. I not sure if we have Crnchie spread here, but I’m sure I can find something to replace it. Thanks for sharing this recipe! Yummy!
I hope you find something to replace it, if not I’m sure just using Crunchie bars would still taste amazing!
These sound so yummy! I have a new found love for honeycomb and these sound really up my street – Sarah is a great baker and her recipes never fail to amaze me!
All of her recipes look amazing don’t they?!
These look delicious! I’m saving this so I can give it a go, thanks for sharing!
I hope you enjoy them!
Wow! Thank you for sharing this recipe, I definitely need to have a go at this! I will pin this for later.
They look delicious, you should definitely check out Sarah’s blog for some more amazing recipes!
Wow this recipe looks amazing 👏 I LOVE crunchies so inam most definitely going to be making this soon!! 😋
They look so good don’t they?!
Me neither but these look sooo good!
I hope they turn out good and you enjoy them!
They look so good, I’m definitely going to be giving them a go myself!
I love Crunchies so combined with a brownie and it’s just perfection!
Thanks for sharing, these brownies look lovely 🙂
They really do!
Sounds yummy!
Thanks!
These look and sound so amazing. I’ve always loved Cadbury chocolate over an other type. But I can’t say I fell in love with chruncies until university when we started drinking honeycomb cocktails!
Honeycomb cocktails sound amazing!