At the start of the year we finally began renovating our kitchen. It’s been a long time coming as aside from moving the boiler out of the kitchen we haven’t done anything with the room since moving in 2 and a half years ago. It was the room I hated most as everything was cheap looking, damaged and dark and when we had the boiler moved it left an absolute mess on the wall and ceiling which just added to my hatred of the room. Our kitchen is pretty small so space has always been an issue. If you read my Kitchen Renovation Plans on a Budget post then you’ll know the rough idea we have for the room, to be honest some plans have changed since then but they’re going to be happening in the future so they’ll get covered another day. For today’s post I’m focusing on the things we’ve already done.

We’ve actually changed quite a lot in a short space of time, as I’ve mentioned there is lots more to do but we’re sort of having to wait on other people for the project to move forward but I’m already so much happier with the room. I can’t take any credit for the work done here as it was all done by Josh and his Dad which I’m super grateful for. So lets get into it with some before and afters!
Walls: Before

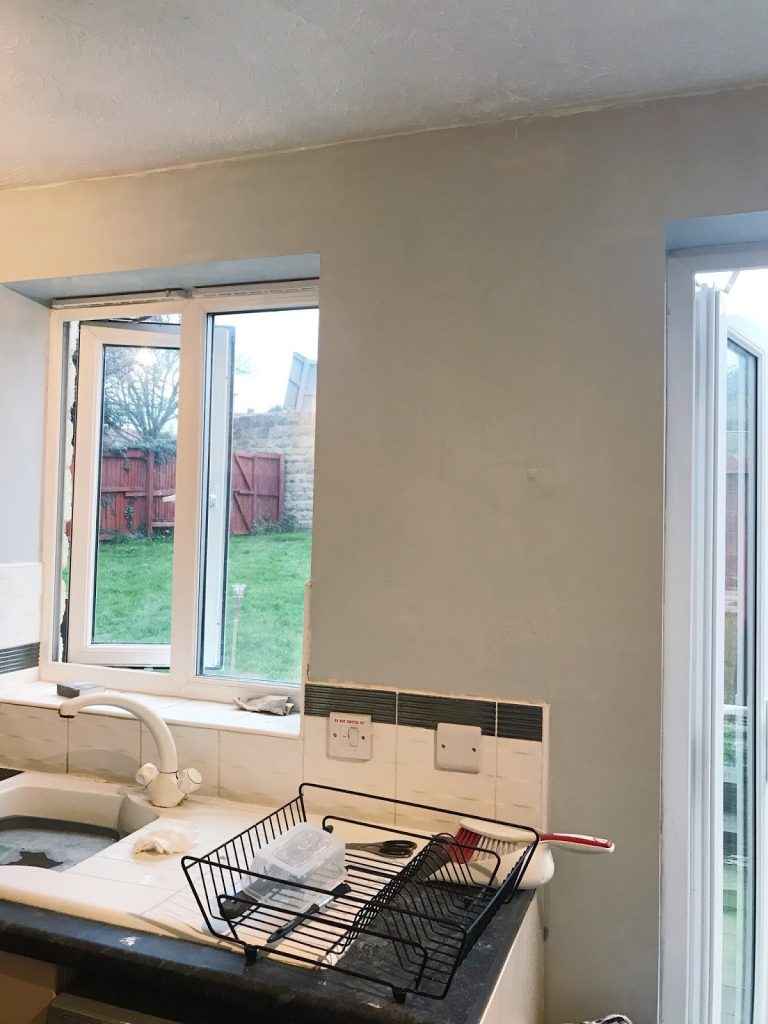
The walls were a pale grey and covered in holes and patches. When we first moved in there was quite an old boiler on the wall, you can see what the kitchen was like with the boiler in it in this post. We quickly had it replaced and removed and now it’s out of site upstairs but as you can see in this photo it left a real mess behind, the tiles were broken, the wall was very roughly plastered and there were holes in our ceiling where to boiler pipes had been cut off. We also discovered when we started the renovation that the pipes in the wall from the boiler hadn’t been removed or pushed back. Bizarrely we still have the main control switch for the boiler downstairs then a capped off switch which you can see on the tiles.
Walls: After
We actually painted the walls quite a similar colour to what was already there, what can I say, we like grey! But it makes such a difference not having patchy walls. The old boiler wall was hard work and I’ll be honest it’s not 100% now but there is absolutely nothing more we can do with it, unfortunately the workman we had to do the boiler wasn’t too careful about what he left behind. The holes were polyfilled then the whole thing was sanded down, the pipes in the wall and ceiling were (carefully) knocked back, packed and filled and we removed the broken tiles too before painting. We’re actually replacing all the tiles eventually so we may put the tiles back up to where they were and then we’re going to get a big print to try and disguise how even the wall is where the boiler was. The boiler switch will have to remain where it is but hopefully the capped off switch is going to get rewired to control some lights under our kitchen cabinets in the future.
Floor: Before

Unfortunately this is one of the only photo’s I have of the floor before and it doesn’t show how horrible it was at all! It was black vinyl flooring that we ripped and dinted when we moved in. The black did nothing for such a small room and even though we have a window and French doors in this room it never seemed all that bright. The original plan was to replace it with more vinyl flooring just in a lighter colour.
Floor: After

Ok so this photo was part way through tiling but you get the idea! We decided to tile after pricing it up and realising it wasn’t going to cost too much more than vinyl but be a lot more hard wearing. Luckily there was an offer on the tiles too which reduced the price even more. I can’t begin to describe how much of a difference the flooring has made to the room, everyone has commented on it. It’s so much brighter now and feels much bigger. We opted for the Brook porcelain tiles from Wickes with grey grout and they honestly look amazing, I love them!
Dining table: Before

We had a black glass and chrome dining table which we bought before we moved in and within about 2 months of putting it in the kitchen I hated it. The chairs were never out because the cats scratched them and the whole thing just crowded the room. 99.9% of the time we just had a big table in the room with no chairs and the only time we used it was at Christmas. We’d originally planned to buy a bar table to go in this same corner and a couple of stools but we were struggling to find something that worked for our space. Josh had thought about building a table briefly but didn’t really know where to start.
Dining table: After

Say hello to my beautiful baby, an 8ft long, handmade breakfast bar! This baby was built from scratch by Josh and his Dad, after Josh had the vision, his Dad was able to find all the things we needed and show Josh how to build it. I cannot tell you have much I love the fact that we have a handmade breakfast bar in our house and I love that Josh helped to make it! I was a little overwhelmed by the thought of having a breakfast bar running the entire width of the room as first but it works so well! And I love our bar stools, we opted for the Ottawa stools from Argos. It’s the perfect addition as we have a space we can use that makes the room feel so much bigger than the traditional dining set we had did. It also comes with a really cool addition too…
The bottle rack!

Again this was handmade by Josh and his Dad, it actually took longer to make than the table but I love it so much! All our wine and spirits bottle just used to be out on the side cluttering up the work surface and now they all fit in here! It was actually made to support the breakfast bar as it’s so long it needs a little extra support but instead of having a normal boring leg we’ve made it into extra storage that works so well.
So that’s it for part 1 of the renovation, part 2 probably won’t be coming for a while but I honestly couldn’t be happier with what we’ve done so far, it’s made me fall in love with a room I absolutely hated, I now actually want to spend time in this room and we’ve used the breakfast more times in the month we’ve had it than we ever used the tables. This is a project I’ve wanted to tackle for so long and what we’ve achieved so far is so much better than I ever imagined, I just love that we’ve got homemade, bespoke pieces in our kitchen and everything works so well together. I cannot wait to finish this room and finally be on my way to having my dream kitchen!

Leave a Reply